Filezilla Host And Port For Mac Laptop
File Transfer Protocol can be a very useful tool when you need to make direct changes to your website. From uploading images to downloading all of your files for backups, FTP software can make it happen. FileZilla is one of those free programs that gives you control over the files which make up your website. In this guide, I will show you how to use FileZilla and what it can do for you., making these connections is much easier. Why Use FTP Programs to Make Modifications? The use of FTP software can give you access to files on your website directly.
This means you can remove, change, delete or upload modifications to your site from your computer. Many developers use these kinds of tools in order to work on webpages offline. Once the files are created, you can easily upload them to the host. In addition, these programs also help you create a mirror of the site on your computer system.
Hackers will constantly scan the internet for hosts listening on port 21, the default FTP port. To avoid being detected by the thousands of hackers constantly scanning for people like you with an FTP server, we can change the port that FileZilla listens on. Go to Edit and then Settings.
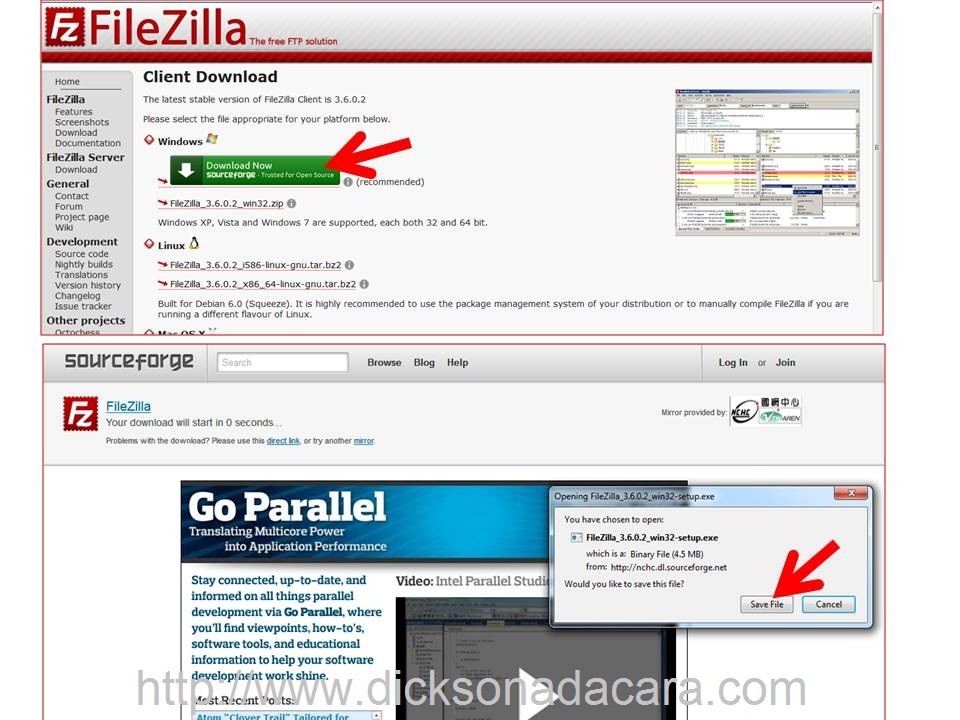
This can be very beneficial when you need to recover from file corruption thanks to malware attacks. Essentially, you can create a backup copy by downloading all of the files from your website. How to Use the Client for FileZilla The first step to using the software is downloading and installing it onto your computer. To do this: Go to. Click on the button to download the client. On this next page, you will select which operating system you use on your computer.
Note: Filezilla is compatible with Windows 64-bit, 32-bit, Mac OSX and Linux. Once you have downloaded the software, follow the instructions to install.
Connecting to Your Server with Quickconnect Quickconnect is a feature of FileZilla that lets you quickly access your website files. You will need to know the login credentials for the FTP account. Here is how you connect to your server using this method: Log into your cPanel host.
If you do not have access to cPanel, you will need to contact your. Scroll down to the “Files” section and click on “FTP Accounts.” In this next window, scroll down until you find the FTP account you wish to use.
Note: If you don’t have one specifically for the website you wish to access, you may have to create an account. Click the link to “Configure FTP Client.” Take note of the username, server and port under manual settings.
You can also download the FTP configuration file specifically for FileZilla if you’re using Windows. Input this information into FileZilla. Take note that “Server” from cPanel and “Host” from FileZilla are one in the same. Once you have the fields in FileZilla filled out, click the “Quickconnect” button. You now have access to all files within your website. In FileZilla, the local site on the left is your computer while the remote site on the right pertains to your actual website.
Connecting to Your Server with FTP Configuration File If you download the FTP configuration file from cPanel, you can set up FileZilla automatically. By default, using this method will ask you for the password before you can actually connect. However, we’ll show you how to change that in a moment. To use the config file: Go to “File” in FileZilla and select “Import.
When the import window opens, find the FTP file you downloaded. It will be an XML file. Create usb boot disk for mac os sierra 10.12.6 download.
Select the file and click the “Open” button on this window. FileZilla will add all of the pertinent information except for the password. Go to “File” in FileZilla, but this time select “Site Manager.” It should be the first option in the drop-down menu.
Here, you will see an entry in “My Sites” for your website. On the right side, find the “Logon Type” control. It should be set to “Ask for password” as default. Click this drop-down window and select “Normal.” Now, you can enter in the password for the FTP account. Once you are done, click “OK” to save your changes. Now, you can connect to your web host without typing the password in every time. How to Manage Your Files Now that you’re able to connect to the web host server, it’s time to manage your files.
You want to be careful as to what you change in the remote site area as you could inadvertently corrupt your website. This could result in your webpages no longer working correctly. Creating a Local Site One of the best practices when using FileZilla is to have a local site prepared on your computer.
Essentially, this is a folder on your computer that will hold your website data. It’s better if you use a single folder for this purpose in order to keep files separated and easy to find. To do this: Use the navigation in “Local site” to find the area in which you want to save your website files. For this tutorial, we’re going to use the “My Documents” area. Right-click “My Documents” from the local site window in FileZilla. Find the option to “Create a directory and enter it” and click. This will bring up a small window to name the new directory.